|
Screen Shot: Project BOB
|
SORRY NO PIC
CIVILIAN
Weapon
The civilian uses only a crowbar.
Special Skill
Die -- repeatedly.
Strengths
Usually the civilian plays an important role in a map. There are maps where the civilian will be the president and guards will have to escort him to a given location. The civilian is only as smart as the person playing him. Biggest strength: Opponents will be laughed off the server if they are killed by the civilian.
Weaknesses
Well his isn't the fastest person in the game, nor is he the strongest, he doesn't have mid or a long range weapons so this class does not have much going for him.
How To Kill A Civilian
With only 50 health, you take him down with any weapon. I like to keep the battle fair, so sometimes, kill him with your crowbar.
|
|
|
This is one of the granite rooms. This rock surface is one of my favorites. Off to the west of this tunnel is a green crystalline room which is really cool.
|
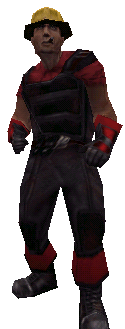
 Engineer
|
Weapons
The engineer carries the double-barrel shotgun, the railgun, and his trusty spanner.
The rail gun is good for long shots, but the shotgun is the most dangerous weapon the engineer carries. It should be used for close range battles. However, the engineer is also capable of building items, which makes him one of the more important classes.
Special Skills
Hitting the special skill key (right mouse button by default) will bring up the build menu. The engineer is capable of building sentry guns and ammo dispensers.
Grenades
The engineer carries the standard fragmentation hand grenade and the electro-magnetic pulse (EMP) grenade. The EMP grenade can be the most devastating or most useless grenade in TFC. It's up to the engineer how effective the EMP is. First, realize the EMP works but exploding other sources of ammunition around it. It doesn't actually explode for damage by itself. Throw an EMP into an empty corner and it'll do nothing. Throw an EMP next to some ammo bags and watch everything go boom.
When I say that an EMP will explode any ammunition around it, I must stress it explodes almost everything. This includes ammo bags, set pipebombs, and even detpacks. If a player is carrying explosive ammo like shells, rockets, or pipes, an EMP will even set that off too. This is why an EMP is so effective against heavier classes such as the soldier, demoman, and HWGuy. These classes are carrying so much ammo that if they are caught in an EMP blast, they'll be blown to bits. The problem, however, is when a player is not carrying a lot of explosive ammo, such as a scout. A scout can survive an EMP blast quite easily if they don't have any shotgun shells on them.
The EMP grenade blast radius extends in 3 dimensions. It goes out, up, and down. You must also realize that the EMP blast can go through walls, boxes, floors/ceilings, and water. These two facts must considered to make effective use of the EMP. For example, in the canalzone2 map, many teams will amass players just outside the enemy doors. They are waiting for the doors to open so they can rush into the enemy base. An EMP grenade, tossed to land just in front of the door can clear them out in one huge blast. No other grenade can make its effect be felt through solid objects... use this to your advantage.
A popular tactic with an emp for engineers is to discard any rockets/explosives that you have; prime the emp, and charge the enemy this is called the "suicide emp," but sometimes when you do it just right, it can result in dead enemies and you no worse for wear.
One final note about the EMP, make your toss count. Don't just throw the EMP away without priming it. A skilled player will know an EMP is serious news, and will run away from it. Prime the EMP so that it explodes just as it gets to its intended target.
Strengths
The coolest thing about the engineer is his ability to build automated sentry guns that track and fire at any enemies that comes into its range. A skilled engineer is the backbone of almost every good defense. To build a sentry, start by finding a suitable area. Sentry placement is critical to defense. Finding a place too out in the open means your sentry will be easily destroyed. Finding a place too well covered means it won't track enough enemies. Each map has its own perfect places to put a sentry. Watch experienced engineers for clues. Oh, and make sure you have enough metal to make the sentry. Switch to the wrench and look for the metal counter on the bottom right, it should read 200. If it doesn't, pick up some more ammo bags.
When you've found your spot, bring up the build menu and pick the option that says "Build sentry gun". If the spot is acceptable, you will see a tripod come down and you will hear some building sounds. Note that your gun will be built facing the way your back is facing. You can change its orientation later, but getting it right the first time can save valuable time. Now at this time you are extremely vulnerable, you cannot move and you cannot fire or toss grenades. After a few seconds, the building will be complete and you will be able to move again. A finishing sound will signal the end of building. Be careful when you start to build. A spy loves catching an engineer in the act of building because you are so helpless. Also, realize that everyone, even the other team, can hear these building sounds. Anything built for your team will be announced team-wide with a message. If you hear something being built and no message acknowledges that, then the other team built it.
Alright, so you've finished building, what do you have right now? You have a puny, level one sentry gun that fires single shells at a slow rate. At this level, it is extremely vulnerable, and it won't take out many opponents at all. Note also that your sentry's stats are listed on the bottom left of your screen. You can see the health and ammo level. This helps you monitor sentry remotely. Now, your goal is to upgrade the sentry from level one to level three as fast you can. High-tail it from your sentry and grab some ammo bags. Switch to your wrench and make sure your metal counter is 130 or higher. One hundred and thirty is the minimum metal count for upgrading your sentry. Now get back to your sentry and hit it with your wrench. A menu should pop up. Pick the "Upgrade sentry gun" option. Your sentry should now look much meaner and more powerful. At level two, the sentry now has a single rotating barrel that fires shells at an amazing rate. Hit the sentry again with your wrench. This time choose the option that adds ammo to your sentry. Keep adding ammo until you have no more to give. The sentry is powerful now, but there is one more upgrade to go. Grab some more metal (again 130 or more) and upgrade it again. Now it is at level three, the highest level. Your sentry will now have dual rotating barrels and a rocket launcher. Be sure to immediately add ammo after upgrading because your sentry won't have any rockets in it. Now sit back watch your kills climb!
Ok, to be honest, after a few of the enemy gets cut down by your sentry, they won't like it and they will go after your gun. In my opinion, a sentry gets built so that the other team can destroy it. Re-building sentries is a fact of life, so don't get too attached to your gun. So before the enemy can destroy your gun, disassemble your gun, and rebuild it in another location. This should raise your chances of stopping the enemy.
The second thing an engineer can build is an ammo dispenser. A dispenser can allow your teammates to grab ammo and replenish armour without having to go all the way back to a respawn area. Help a guy out who's guarding the flag, build a dispenser for him. To build one, make sure you have enough metal and find a suitable spot. Bring up the build menu and pick the "Build dispenser" option. The resulting dispenser will be empty at first, and it will take a few seconds for it to produce some armour and ammo. Left alone, it will automatically keep producing armour and ammo until it's capacity is reached. To take from the dispenser, just run up to it and a menu will ask you what you want. You can also ferry armour and ammo to the dispenser if its not producing fast enough for you. To do this, crouch and walk up to the dispenser without touching it, then hit it with your wrench. A new menu will come up allowing you to add things to the dispenser. Note that your dispenser can take damage, but you can also repair using menu I just described.
The dispenser can also be used for defense as well (like a poor man's sentry). If any of the enemy players touches your dispenser, you will get a message saying "Enemies are using your dispenser!". At this point, you can blow up the dispenser by accessing the build menu and choosing the "Detonate dispenser" option. However, this takes a lot of time, and the enemy player might be out of range by the time your dispenser blows. What you should do is bind one specific key that blows your dispenser immediately. For example, I use the 'p' key to blow up my dispensers. To do this, pull down the console and type:
bind p detdispenser
You can use any key you want, I just like using the 'p' key. For defensive purposes build the dispenser in narrow doorways or corridors, where you don't want the enemy to be going. The dispenser is able to detect spies even if they are in disguise. Many times I've seen someone with my team's colour touch my dispenser and I got the "Enemies are..." message. I immediately knew this was a spy and I blew my dispenser, taking the spy out as well. Note that the more ammo (especially rockets) that is in the dispenser, the larger the resulting explosion will be you detonate it. Thus, if time allows, ferry ammo to your dispenser using the method described in the previous section.
The engineer can also make ammunition. Pressing the drop ammo key ('x' by default) will cause the engineer make a quantity of ammo of all types.
The engineer is also a mobile armour repair station. If you see that a teammate is low on armour, switch to the wrench and hit your friend with it a few times. If you have enough metal, his armour will increase back up to 100%. Note that some idiots will not know what you are doing and they will switch to the crowbar and smack you back. This of course, will take away your armour, when your intent was just to be nice and help a guy out. This happens a lot, just tell him you were trying to help, explain what your doing and show him how it works. We were all newbies once, and needed to learn this.
Finally, the effectiveness of the engineer class increases exponentially when there are two engineers on a team. Why? First, two engineers can build a sentry from scratch to level three in less than 15 seconds. Other engineers are free to upgrade any other teammate's sentry as they wish. Second, two engineers mean that two sentries are available for use. By carefully placing the two sentries, their locations can support and compliment each other. This can make it very difficult for the enemy to get both sentries. Third, having another engineer means that another person can help maintain your sentry. If you are on the other side of the map and your sentry gets damaged or needs ammo, you can shout for help. Your engineer teammate can then repair and add ammo for your sentry.
Weaknesses
The engineer is only moderately effective when he doesn't have a sentry or a dispenser built (though the EMP still makes him someone to be cautious about). Keeping an engineer from building anything takes away all of his advantages. Also, an engineer's sentry cannot detect disguised spies. See the spy class info page to see how to keep spies away from your sentry.
How To Defeat An Engineer (or any of his blasted contraptions!)
When it comes to the engineer, it's more effective to destroy his sentries and dispensers than actually eliminating the player. The engineer's sentry will be your most important target. Realize that sentries cannot move and will not fire on you if it can't see you. Most sentry killing is done by bouncing grenades around corners and off walls to where the sentry is located. Some like the suicide route, where a player rushes a sentry all the while throwing his grenades at it. A more elegant solution, which infuriates other engineers, is to use a disguised spy. Sentries cannot detect disguised spies which means they are free to waltz up to enemy sentries and toss grenades at them. This method is nearly fool-proof for destroying sentries. Note also that sentries make sounds when they sweep through their covering arc. This unique sound can signal that an enemy sentry is nearby (careful around the next corner!).
Often on your way to an enemy objective, you'll see a dispenser placed in your way. An enemy engineer has done this so that he can detonate his dispenser when you touch it, thus hurting you with the resulting explosion. The simple way to get around the dispenser is to destroy it. Stand a fair distance from the dispenser and fire at until it explodes. Watch out for the resulting explosion, a dispenser with a full 300 rockets has a huge blast radius. I've taken out several opponents who didn't realize how stocked up my dispenser was. Note that even if you do take out the dispenser successfully, the engineer will know his dispenser was destroyed. Undoubtedly, he will be coming to investigate or call others to check for him.
One final note, it takes time for an engineer to set up his defenses like his sentry and dispenser. As a team, if you can harass the enemy engineer so that it's impossible for him to build anything, he might stop and just try to fight.
|

|
|
|
|
|
|
|
|
|
|

|
|
|
|
|
|
|
|